

How To Set Outlook Account On Android
If you're having trouble using the Outlook for Android mobile app, Open an in-app Outlook support ticket.
If you have a work or schoolhouse account that uses Microsoft 365 for business or Exchange-based accounts, there may exist additional requirements set by your IT admin. For case, if you have a company-managed device, an on-premises Commutation server configured for basic authentication, or your visitor requires mobile app management for app protection. See the section Set upwardly Outlook for Android with boosted requirements below for specific instructions.
Ready Outlook for Android for the offset time


Note:If you have a work account that requires the Intune Company Portal app, install information technology from the Google Play Store before setting upward Outlook for Android. Your IT admin may or may non besides crave you to Enroll your Android device in Intune.
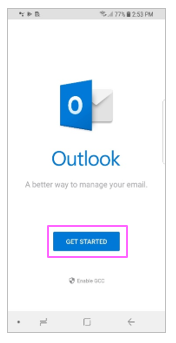
Install the Outlook for Android app from the Google Play Store and then open up it.
Tap Go Started if this is your showtime time.
Otherwise, to add another e-mail business relationship, open the Bill of fare  > Settings
  > Add Business relationship > Add together Email Account. Then skip to pace 4 nether Set up another electronic mail account beneath.

Outlook may notice your Google accounts. To add them to Outlook for Android, tap Google Connect Account and then tap OK to confirm. Tap Allow to requite Outlook access to your Contacts.

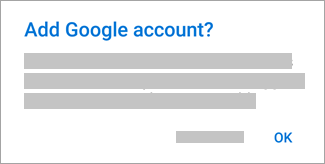
If you lot don't want to add these accounts, tap Skip and then go to step 4 under Prepare another electronic mail business relationship below..

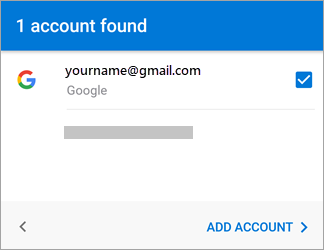
Select the accounts you'd like to add together and tap Add Account. You may be asked to sign in.
Tap Let to confirm offline access and whatever other prompts.
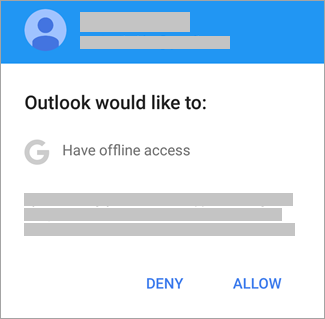
To add another email account, tap Continue and go to Stride 4, otherwise tap Skip.
Ready another email account

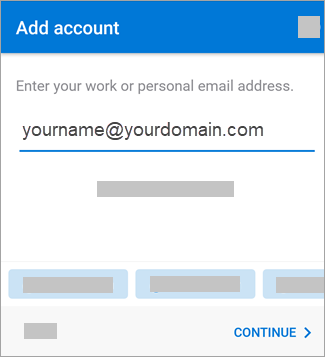
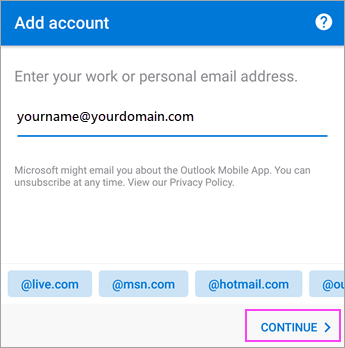
Enter your full email address, then tap Continue.
Notation:If you're asked to choose your provider, you'll have to Set up your Exchange manually or set up up an IMAP or Pop account.

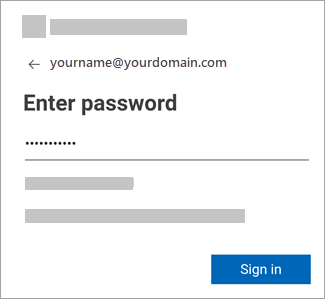
Enter your email business relationship password and tap Sign In or Next.
Note:The sign in screen may look different for you depending on your electronic mail provider.

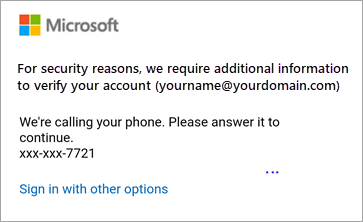
If multi-gene authentication is enabled, verify your identity. For more data, see Security info overview.
Gear up work/school accounts that accept additional requirements
Some piece of work and school accounts have boosted security requirements earlier yous tin use Outlook for Android. If yous're not certain which of these situations applies to your work or school business relationship, talk to your Microsoft 365 admin.
Click on an expander to open up it:
In one case you begin the enrollment procedure, you should complete the process in its entirety since pausing for more a few minutes usually stops your progress and requires you to start over. If this process should fail, you demand to return to the Company Portal app to endeavour over again.
-
Open the Google Play Store. Search for and download the Intune Visitor Portal app.
-
Note:In instance you are prompted for multi-gene authentication, please refer to Security info overview.
-
Open the Outlook for Android app. If you were prompted to create a work contour, use the work profile instance of Outlook to add your account.

Notes:When a device is enrolled, managed apps – including Outlook – can be installed in a few different ways:
-
You install the app from the Company Portal app
-
Your company may automatically install it during the enrollment process
-
You install the app from Managed Google Play
-
-
Tap Get Started.
-
If your account is establish, tapContinue.
Note:If your account is not automatically found, enter your company email accost, tap Add together Account, so enter your countersign when prompted.
-
Enter your e-mail account countersign, and so tapSign In.
-
Your visitor may have also implemented controls that will crave y'all to Register earlier y'all tin can proceed. Past registering, yous are verifying your identity so the device can be validated past your organization. If prompted to register your device, tap Register.
-
If your It admin has set boosted policies, you lot may need to tapActivate andActivateagain.

Note:Later you open Outlook, your experience will be adamant by a variety of factors including your company's policy settings and whether you previously accessed corporate resource with your device. Follow the prompts that appear on your device for your given circumstances.
Yous're at present ready to outset using Outlook for Android! Get the nigh out of Outlook:
Optimize the Outlook mobile app for your telephone or tablet
Outlook for Android Crook Sheet
Intune app protection policies can be configured and implemented without device enrollment. Notwithstanding, for Android devices, you are still required to install the Intune Company Portal app on the device for app protection policies to be enforced.
-
Open the Google Play Store. Search for and download the Intune Company Portal app.
-
If you haven't already, install the Outlook for Android app from the Google Play Shop or click here to enter your telephone number and receive a download link.
-
Open up the Outlook for Android app.
-
Tap Become Started.

-
Enter your company email address, and so tapProceed.
-
If prompted, enter your electronic mail business relationship password, then tapSign In.
Notes:
-
Your experience may vary depending on your company's requirements. For case, you may be prompted to authenticate by using the Microsoft Authenticator app or verify yourself by text or phone. For details, run across Security Info Overview.
-
Your visitor may have also implemented controls that will require you to Register earlier you can proceed. By registering, y'all are verifying your identity so the device can exist validated by your organization. If prompted to register your device, tap Register.
-
-
If prompted to add together another account, tap Peradventure Later.
-
Tap Skip or swipe through the characteristic screens.
-
The bulletin, Your system is now protecting its information in this app. You need to restart the app to continue, appears. Tap OK.
-
Restart Outlook for Android and ready upwards a Personal Identification Number (Pivot) when prompted.
Yous're at present ready to start using Outlook for Android! Get the most out of Outlook:
Optimize the Outlook mobile app for your phone or tablet
Outlook for Android Crook Sheet
-
If you haven't already, install the Outlook for Android app from the Google Play Shop or click here to enter your phone number and receive a download link.
-
Enter your visitor email address, then tap Continue.

-
Tap Exchange.
-
Enter your visitor email address and countersign to automatically configure your account. Tap Sign In.
Notes:If automatic configuration fails, tap Continue, and so enter the following settings manually:
-
Server name: This is ordinarily the same name you enter when checking your e-mail on the spider web.
-
Domain: This is usually optional. If unsure, check with your Information technology ambassador.
-
Username: This is your company email address.
-
Password: This is the password for your company email business relationship.
-
-
Tap Next when finished and swipe through the features.
Y'all're now set to beginning using Outlook for Android! Get the almost out of Outlook:
Optimize the Outlook mobile app for your telephone or tablet
Outlook for Android Cheat Canvass
-
In Outlook for Android, get to Settings
> Add together Account > Add E-mail Account. -
Enter email address. Tap Continue.
-
Tap Setup account manually if available, and then on the e-mail provider page choose Exchange and toggle Avant-garde Settings on.
-
Enter your server setting details, if available and so tap the checkmark icon.
Incoming Server Settings
-
Domain\Username
Enter your full email address, such as yourname@yourdomain.com. -
Password
Use the password that you use to access your email. -
Server
-
Commutation accounts - See the section, Find your Exchange mailbox server settings or ask your It admin for your server data.
-
Microsoft 365 work or school accounts - Use outlook.office365.com.
-
-
Port
Utilise 443 or 993. -
Security blazon
Select SSL/TLS or make certain the Use secure connexion (SSL) checkbox is checked, so tap Next.
Outgoing SMTP Server Settings
-
SMTP Server
-
Exchange accounts - Ask your IT admin for your server info.
-
Microsoft 365 work or schoolhouse accounts - Use smtp.office365.com.
-
-
Security Type
Choose TLS. -
Port Number
Enter 587. Tap Side by side.
-
-
You may exist prompted to enter your electronic mail account password over again or agree to/activate any necessary permissions.
Need more help setting up Outlook for Android?
This article was last updated on December three, 2022 considering of your feedback. If yous still demand help setting up email using Outlook for Android, Open an in-app Outlook back up ticket or tell united states of america almost your question in detail using the comment box below and so we tin can accost information technology in the future.
If y'all desire to fix an IMAP or POP electronic mail account, or don't have an email account with Exchange ActiveSync, utilize these instructions . When you fix upwardly an email account using IMAP or POP, only your email will sync--not calendar or contacts. What is IMAP and Popular?
To set up a POP account, see Ready a Pop email account in Outlook for iOS or Android.
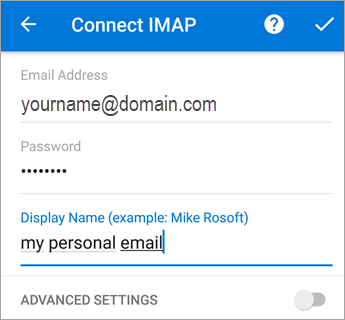
Set upwards IMAP account in Outlook for Android
-
In Outlook for Android, go to Settings > Add Account > Add Email Account.
-
Enter e-mail address. Tap Continue. When asked to select an email provider, choose IMAP.
-
Toggle Advanced settings on and enter your password and server settings.
Note:If you don't already know this info, yous'll need to become it from your e-mail provider or administrator. For a listing of common server settings and reference help, encounter Server settings y'all'll need from your email provider.
-
Tap the checkmark icon to complete.
To change your password you must go to your electronic mail provider'south website to alter them.
-
Go to your e-mail provider's website.
For case, if you use a @hotmail.com email account, sign into outlook.com or if yous use Gmail, go to Gmail.com.
-
Get to your business relationship or profile settings.
-
Change your password.
-
Outlook for Android will notice a sync error and volition ask you to enter your password again.
If you are having difficulty getting Outlook for Android to sync with your new countersign, delete your email business relationship and so re-add information technology.
Note:If you change the password for your electronic mail business relationship that is also your Microsoft account, you may need to login again on other Microsoft applications and websites.
Get the most out of Outlook
Optimize the Outlook mobile app for your telephone or tablet
Outlook for Android Crook Sheet

How To Set Outlook Account On Android,
Source: https://support.microsoft.com/en-us/office/set-up-email-in-the-outlook-for-android-app-886db551-8dfa-4fd5-b835-f8e532091872
Posted by: parkdoutiou53.blogspot.com
0 Response to "How To Set Outlook Account On Android"
Post a Comment